
Part.2 ではAPIの作成までを行いました。今回はVue.jsでビューを作成し、ブラウザから出欠状況を確認できるようにしていきます。
過去の記事は以下から。
Laravel + Vue.js で出席管理Webアプリを作成する – Part.1
Laravel + Vue.js で出席管理Webアプリを作成する – Part.2
ルーティングの設定
Web画面のルーティング設定はroutes/web.phpに記述する必要があります。以下のように、ホーム画面(出席一覧画面)のルーティング設定を行いましょう。
routes/web.php
Route::get('/', 'AttendancesController@index')->name('home');Controllerの設定
$ php artisan make:controller AttendancesControllerapp/Http/Controllers/AttendancesController.phpが生成されるので、以下のように編集します。
app/Http/Controllers/AttendancesController.php
<?php

namespace App\Http\Controllers;

use Illuminate\Http\Request;

class AttendancesController extends Controller
{
    public function index()
    {
        return view('attendances.index');
    }
}
Viewの作成とアセットコンパイルの準備
パッケージのインストールとアセットのコンパイル
ホーム画面のビューを作成していきます。まずは開発環境にssh接続した状態でパッケージのインストールし、Laravel Mix(後述)を使用してアセットのコンパイルを行っておきます(CSSやJavaScriptの修正をするたびにコンパイルするのは面倒なので、watchタスクとして実行しておきましょう)。
$ cd ~/Homestead
$ vagrant ssh

$ cd ~/code/LaravelSample
$ npm install

# Docker上やLaravel Homestead環境の場合、
# watch ではなく watch-poll を使用しないと変更を検出できないようです
$ npm run watch-poll
マスターレイアウトの作成
artisanではViewを作成する手段は提供されていないため、自分で作成する必要があります。
マスターレイアウトとしてresources/views/配下にmaster.blade.phpを手動作成し、以下のように編集してください。
resources/views/master.blade.php
<!DOCTYPE html>
<html lang="{{ app()->getLocale() }}">

<head>
    <meta charset="utf-8">
    <meta http-equiv="X-UA-Compatible" content="IE=edge">
    <meta name="viewport" content="width=device-width,initial-scale=1">
    <title>LaravelSample - 出席管理</title>
    <meta name="csrf-token" content="{{ csrf_token() }}"> <!-- *1 -->
    <link rel="stylesheet" type="text/css" href="{{ mix('css/app.css') }}"> <!-- *2 -->
</head>

<body>
<header class="global-header">
    <section class="header-text">
        <h1><a href="{{ route('home') }}">出席管理</a></h1> <!-- *3 -->

        <div class="tag-line">出席とるよ!!</div>
    </section>
</header>

<main id="app" class="container">
    @yield('content')
</main>

<script src="{{ mix('js/app.js') }}"></script> <!-- *2 -->
</body>

</html>| *1 | 出席データの取得は Vue.js + axiosで行うのでAjax通信となります。Ajax通信にCSRF保護を加えるため、metaタグにトークンを埋め込んでおく必要があります。公式ドキュメント |
| *2 | Laravel Mix(webpackのラッパー)を使ってCSSやJavaScriptファイルを読み込んでいます。設定ファイルはnode_modules/laravel-mix/setup/webpack.config.jsに配置されています。また、読み込むアセットを追加・変更したい場合はプロジェクトルートのwebpack.mix.jsを編集します。 |
| *3 | app/web.phpで設定したルーティング名を指定することで、URLを出力できます。 |
ホーム画面の作成
resources/views/attendances/配下にindex.blade.phpを手動作成し、以下のように編集してください。
resources/views/attendances/index.blade.php
@extends('master')

@section('content')
    <nav class="navbar navbar-findcond">
        <div class="collapse navbar-collapse" id="navbar">
            <ul class="nav navbar-nav navbar-right">
                <li class="active">
                    <a href="#">出席登録画面へ</a>
                </li>
            </ul>
        </div>
    </nav>

    <div class="row">
        <div class="col-md-12">
            <attendances></attendances> <!-- *1 -->
        </div>
    </div>
@endsection| *1 | vue-loaderによって Vue Componentを呼び出す記述です。コンポーネントが未定義なので、現段階では何も展開されません(後述)。 |
CSSの追加
resources/assets/sass/app.scssファイルに、以下のスタイルを追加しておいてください。
resources/assets/sass/app.scss
// Fonts
@import url("https://fonts.googleapis.com/css?family=Raleway:300,400,600");

// Variables
@import "variables";

// Bootstrap
@import "~bootstrap-sass/assets/stylesheets/bootstrap";


body {
  background-color: #fff;
}

main {
  max-width: 750px;
  word-wrap: break-word;
}

.global-header {
    background: #222 no-repeat center center;
    background-size: cover;
    margin-bottom: 30px;

    .header-text {
        position: relative;
        padding-bottom: 1px;
        height: 100%;
        background-color: rgba(0, 0, 0, 0.4);
        color: rgba(255, 255, 255, 0.9);

      h1 {
        margin: 0 auto;
        padding-top: 30px;
        text-align: center;
        font-weight: 200;

        a {
            color: rgba(255, 255, 255, 1.0);
            text-decoration: none;
        }
      }
    }

    .tag-line {
        margin: 10px auto;
        padding: 0 10px;
        max-width: 430px;
        color: rgba(255, 255, 255, 0.7);
        text-align: center;
        font-weight: 300;
    }
}

.article-list h2 a {
    text-decoration: none;
    transition: color 0.1s linear;
}

.post-meta {
    margin: 5px 0;
}

.post-date {
    color: rgba(0, 0, 0, 0.4);
}

.post-tag a {
    padding: 0 10px;
    border: 1px solid rgba(0, 0, 0, 0.3);
    border-radius: 12px;
    color: rgba(0, 0, 0, 0.3);
    text-decoration: none;
    transition: color,border-color,background-color 0.1s linear;
}

.post-tag a:hover {
    background-color: rgba(0, 0, 0, 1.0);
    color: rgba(255, 255, 255, 1.0);
}

.not-found h1 {
    color: rgba(0, 0, 0, 0.2);
    font-weight: 200;
    font-size: 80px;
}

.not-found {
    text-align: center;
}

.author-info {
    padding: 25px 0;
    border-top: 1px solid rgba(0, 0, 0, 0.2);
    border-bottom: 1px solid rgba(0, 0, 0, 0.2);
}

.author-name {
    margin: 0 0 5px 0;
    font-size: 30px;
}

.author-bio {
    color: rgba(0, 0, 0, 0.5);
}

.author-avatar img {
    max-width: 100px;
    max-height: 100px;
    width: 100px;
    height: 100px;
    border-radius: 50px;
}

.author-contact {
    position: relative;
    display: inline-block;
    padding-top: 10px;
    height: 100px;
    text-align: center;
}

.author-contact a {
    display: inline-block;
    padding: 7px 16px;
    border: 1px solid rgba(0, 0, 0, 0.2);
    border-radius: 3px;
    color: rgba(0, 0, 0, 0.7);
    text-decoration: none;
    font-weight: 300;
    font-size: 13px;
    transition: background-color,border-color,color 0.1s linear;
}

.author-contact a:hover {
    border: 1px solid rgba(51, 122, 182, 1.0);
    background-color: rgba(51, 122, 183, 1.0);
    color: rgba(255, 255, 255, 1.0);
}

.pagination
{
    width: 720px;
    text-align: center;
}

.older-posts,.newer-posts
{
    display: inline!important;
    border: 1px solid #ddd;
    border-radius: 15px;
    text-decoration: none;
    transition: border .3s ease;
    padding: 5px 14px;
}

.page-number
{
    display: inline-block;
    min-width: 100px;
    padding: 2px 0;
}

.newer-posts
{
   float: left;
}

.older-posts
{
    float: right;
}

.older-posts:hover,.newer-posts:hover
{
    color: #889093;
    border-color: #98a0a4;
}

/* Override some of Bootstrap's styles */

pre {
    font-size: 14px;
}

pre code {
    overflow: auto;
    white-space: pre;
    word-wrap: normal;
}

.pager li > a {
   transition: background-color 0.1s linear;
}

blockquote {
   font-style:italic;
}

article section img {
    max-width: 100%;
    height: auto;
    margin: 13px auto;
}スタイルが反映されたらhttp://homestead.test/にアクセスし、画面表示を確認してください。

出席登録画面の作成
ルーティングの追加
app/web.phpに出席登録画面用のルーティングを追加します。
app/web.php
Route::get('/', 'AttendancesController@index')->name('home');
Route::get('attend', 'AttendancesController@create')->name('attend');  // 追加
Controllerにアクションを追加
出席登録画面の表示を行うアクションを追加します。
app/Http/Controllers/AttendancesController.php
<?php

namespace App\Http\Controllers;

use Illuminate\Http\Request;

class AttendancesController extends Controller
{
    public function index()
    {
        return view('attendances.index');
    }

    // 追加
    public function create()
    {
        return view('attendances.attend');
    }
}
Viewの追加
resources/views/attendances/attend.blade.phpを手動作成し、以下のように編集します。
resources/views/attendances/attend.blade.php
@extends('master')

@section('content')
    <div class="row">
        <div class="col-md-12">
            <attendance-form></attendance-form> <!-- これも Vue Component -->
        </div>
    </div>
@endsection
出席登録画面が準備できたので、ホーム画面のリンクも修正しておきましょう。
resources/views/attendances/index.blade.php
<a href="{{ route('attend') }}">出席登録画面へ</a>Vue Componentの作成
現在、ホーム画面と出席登録画面には何も表示されていない状態なので、Vue Componentを作成して出席データを表示できるように作り込んでいきます。
ページネーション用ライブラリの追加とコンポーネント登録
$ npm install vuejs-paginate --saveresources/assets/app.js
// 中略

Vue.component('example-component', require('./components/ExampleComponent.vue'));

// 以下3行を追加
Vue.component('paginate', require('vuejs-paginate'));
Vue.component('attendances', require('./components/Attendances.vue'));
Vue.component('attendance-form', require('./components/AttendanceForm.vue'));
ホーム画面用のコンポーネントを作成
resources/assets/js/components/Attendances.vueを作成し、以下のように編集してください。
resources/assets/js/components/Attendances.vue
<template>
    <div>
        <div class="panel panel-default" v-for="attendance in attendances">
            <div class="panel-heading">
                <span class="glyphicon glyphicon-user" id="start"></span>
                 {{ attendance.name }} <label id="started">さん</label>
            </div>
            <div class="panel-body">
                <strong>本日の意気込み</strong>
                <p>{{ attendance.body }}</p>
            </div>
            <div class="panel-footer">
                <span class="glyphicon glyphicon-calendar" id="visit"></span> {{ attendance.date }} |
                <span class="glyphicon glyphicon-flag" id="comment"></span>
                <a href="#" id="comments" @click="report(attendance.id)">Report</a>
            </div>
        </div>
        <paginate
                :page-count="pageCount"
                :click-handler="fetch"
                :prev-text="'Prev'"
                :next-text="'Next'"
                :container-class="'pagination'">
        </paginate>
    </div>
</template>

<script>
    export default {
        data() {
            return {
                attendances: [],
                pageCount: 1,
                endpoint: 'api/attendances?page='
            };
        },

        created() {
            this.fetch();
        },

        methods: {
            fetch(page = 1) {
                axios.get(this.endpoint + page)
                    .then(({data}) => {
                        this.attendances = data.data;
                        this.pageCount = data.meta.last_page;
                    });
            },

            report(id) {
                if(confirm('この出席データを通報します。よろしいですか?')) {
                    axios.put('api/attendances/'+id+'/report')
                    .then(response => this.removeAttendance(id));
                }
            },

            removeAttendance(id) {
                this.attendances = _.remove(this.attendances, function (attendance) {
                    return attendance.id !== id;
                });
            }
        }
    }
</script>
Part.2で作成したAPIの出席一覧エンドポイントにリクエストして出席管理データを取得しています。
出席登録画面用のコンポーネントを作成
resources/assets/js/components/AttendanceForm.vueを作成し、以下のように編集してください。
resources/assets/js/components/AttendanceForm.vue
<template>
    <div>
        <div class="alert alert-success" v-if="saved">出席登録が完了しました!</div>

        <div class="well well-sm" id="attendance-form">
            <form class="form-horizontal" method="post" @submit.prevent="onSubmit">
                <fieldset>
                    <legend class="text-center">本日の勉強会へ出席登録</legend>

                    <div class="form-group">
                        <label class="col-md-3 control-label" for="name">名前</label>
                        <div class="col-md-9" :class="{'has-error': errors.name}">
                            <input id="name"
                                   v-model="attendance.name"
                                   type="text"
                                   placeholder="あなたのお名前"
                                   class="form-control">
                            <span v-if="errors.name" class="help-block text-danger">{{ errors.name[0] }}</span>
                        </div>
                    </div>

                    <div class="form-group">
                        <label class="col-md-3 control-label" for="email">メールアドレス</label>
                        <div class="col-md-9" :class="{'has-error': errors.email}">
                            <input id="email"
                                   v-model="attendance.email"
                                   type="text"
                                   placeholder="あなたのメールアドレス"
                                   class="form-control">
                            <span v-if="errors.email" class="help-block text-danger">{{ errors.email[0] }}</span>
                        </div>
                    </div>

                    <div class="form-group">
                        <label class="col-md-3 control-label" for="body">意気込み</label>
                        <div class="col-md-9" :class="{'has-error': errors.body}">
                            <textarea class="form-control"
                                      id="body"
                                      v-model="attendance.body"
                                      placeholder="本日の意気込み"
                                      rows="5"></textarea>
                            <span v-if="errors.body" class="help-block text-danger">{{ errors.body[0] }}</span>
                        </div>
                    </div>

                    <div class="form-group">
                        <div class="col-md-12 text-right">
                            <button type="submit" class="btn btn-primary btn-lg">出席する</button>
                        </div>
                    </div>
                </fieldset>
            </form>
        </div>
    </div>
</template>

<script>
    export default {
        data() {
            return {
                errors: [],
                saved: false,
                attendance: {
                    name: null,
                    email: null,
                    body: null,
                }
            };
        },

        methods: {
            onSubmit() {
                this.saved = false;

                axios.post('api/attendances', this.attendance)
                    .then(({data}) => this.setSuccessMessage())
                    .catch(({response}) => this.setErrors(response));
            },

            setErrors(response) {
                this.errors = response.data.errors;
            },

            setSuccessMessage() {
                this.reset();
                this.saved = true;
            },

            reset() {
                this.errors = [];
                this.attendance = {name: null, email: null, body: null};
            }
        }
    }
</script>
Part.2で作成したAPIの出席登録エンドポイントにリクエストしてデータを登録しています。
動作確認
resources/assets/js/app.jsにコンポーネントを追加したので、npm run devでアセットの再コンパイルをしておきましょう。
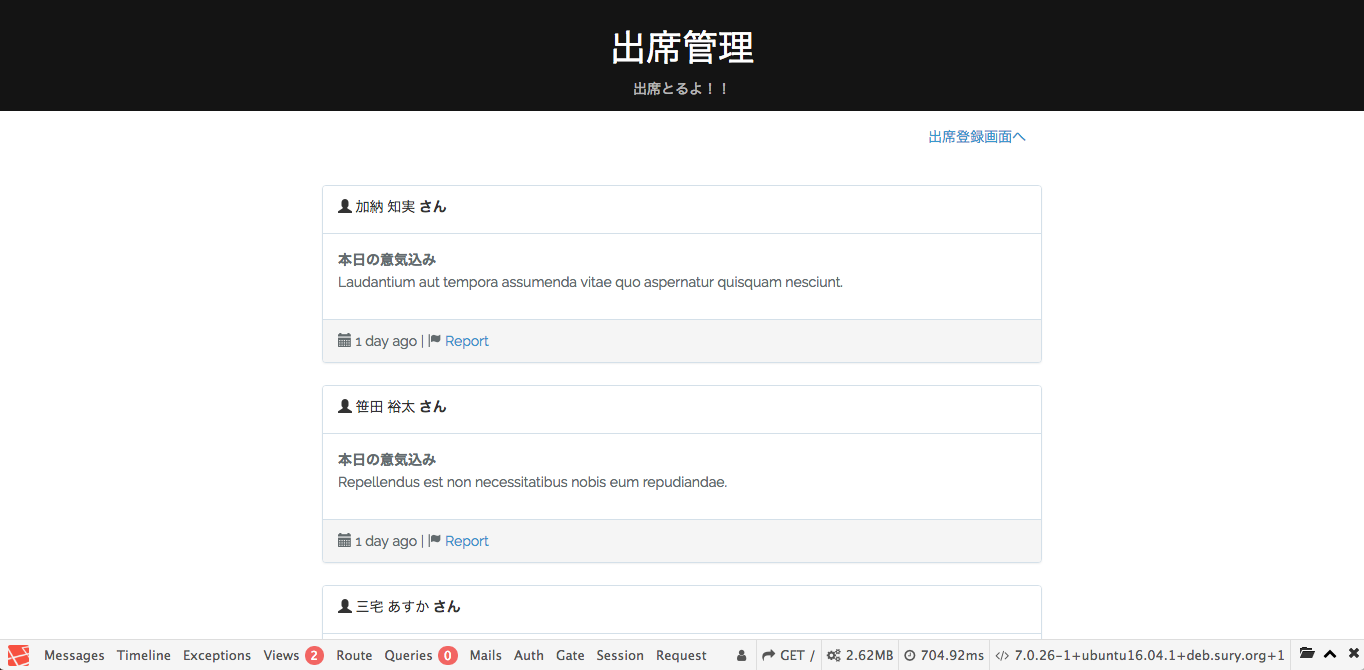
ホーム画面
http://homestead.test/にアクセスし、出席一覧の表示とページネーションが機能していることを確認してください。
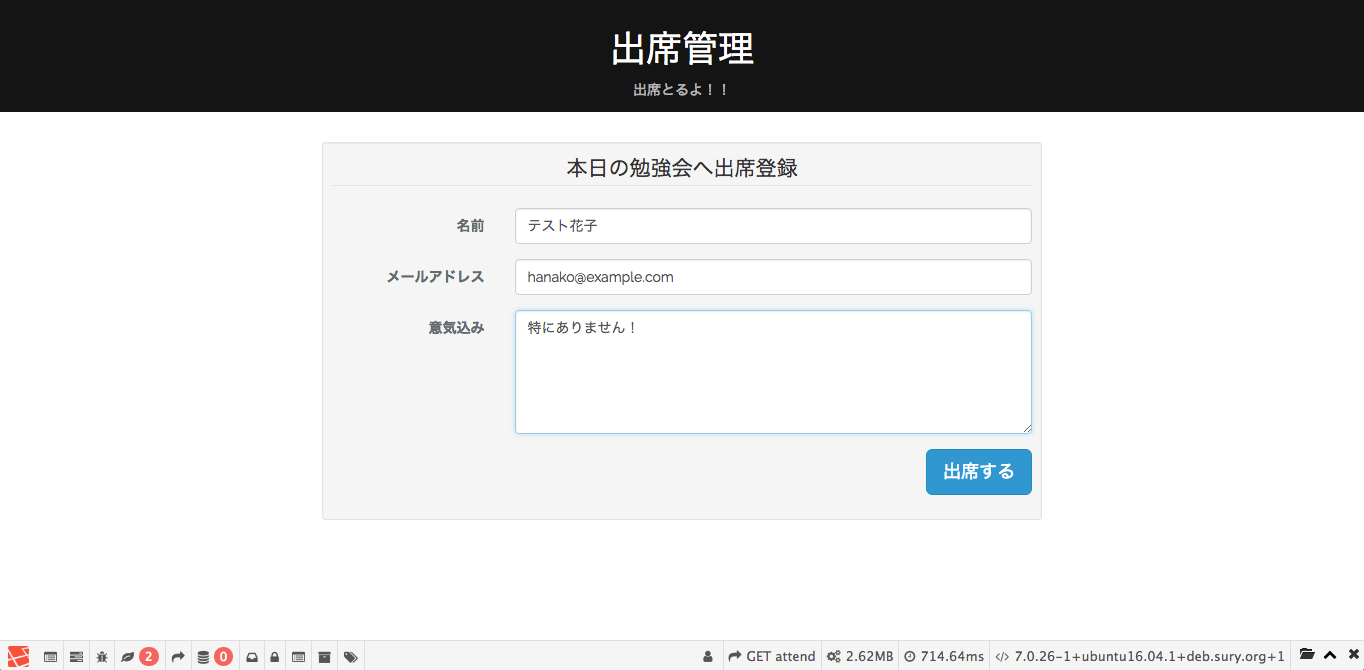
出席登録の動作確認
http://homestead.test/attendにアクセスし、出席登録ができることを確認してください。
今回参加した勉強会について
「 オトナのプログラミング勉強会」は、熊本で開催しているプログラミングの勉強会です。 基本的に月2回(第1水曜日、第2水曜日)開催となります(2017/12/25現在)。
熊本のコワーキングスペース「 未来会議室」共催のオープンでやっている勉強会ですので、ご参加は完全無料です。
(プログラムを書く人を増やす、繋げることが目的なので、誰でも参加できるというスタンスです)